


Data
Communication – What is Data Communication?
Data
communication refers to the
exchange of data between a source and a receiver via form of transmission media
such as a wire cable. Data communication is said to be local if communicating
devices are in the same building or a similarly restricted geographical area.
The meanings of source
and receiver are very simple. The device that transmits the data is known as
source and the device that receives the transmitted data is known as receiver.
Data communication aims at the transfer of data and maintenance of the data
during the process but not the actual generation of the information at the source and
receiver.
Datum mean the facts information statistics or the like
derived by calculation or experimentation. The facts and information so
gathered are processed in accordance with defined systems of procedure. Data
can exist in a variety of forms such as numbers, text, bits and bytes. The
Figure is an illustration of a simple data communication system.
The term data used to
describe information, under whatever form of words you will be using.
A data communication
system may collect data from remote locations through data transmission
circuits, and then outputs processed results to remote locations. Figure
provides a broader view of data communication networks. The different data
communication techniques which are presently in widespread use evolved
gradually either to improve the data communication techniques already existing
or to replace the same with better options and features. Then, there are data
communication jargons to contend with such as baud rate, modems, routers, LAN,
WAN, TCP/IP, ISDN, during the selection of communication systems. Hence, it
becomes necessary to review and understand these terms and gradual development
of data communication methods.
Components
of data communication system
A Communication system
has following components:
1. Message: It is the information or data
to be communicated. It can consist of text, numbers, pictures, sound or video
or any combination of these.
2. Sender: It is the device/computer that generates and sends that
message.
3. Receiver: It is the device or computer that receives the message. The
location of receiver computer is generally different from the sender computer.
The distance between sender and receiver depends upon the types of network used
in between.
4. Medium: It is the channel or physical
path through which the message is carried from sender to the receiver. The
medium can be wired like twisted pair wire, coaxial cable, fiber-optic cable or
wireless like laser, radio waves, and microwaves.
5. Protocol: It is a set of rules that
govern the communication between the devices. Both sender and receiver follow
same protocols to communicate with each other.
A protocol performs the following
functions:
1. Data sequencing. It refers to breaking
a long message into smaller packets of fixed size. Data sequencing rules define
the method of numbering packets to detect loss or duplication of packets, and
to correctly identify packets, which belong to same message.
2. Data routing. Data routing defines the
most efficient path between the source and destination.
3. Data formatting. Data formatting rules
define which group of bits or characters within packet constitute data,
control, addressing, or other information.
4. Flow control. A communication protocol
also prevents a fast sender from overwhelming a slow receiver. It ensures
resource sharing and protection against traffic congestion by regulating the
flow of data on communication lines.
5. Error control. These rules are
designed to detect errors in messages and to ensure transmission of correct
messages. The most common method is to retransmit erroneous message block. In
such a case, a block having error is discarded by the receiver and is
retransmitted by the sender.
6. Precedence and order of transmission.
These rules ensure that all the nodes get a chance to use the communication
lines and other resources of the network based on the priorities assigned to
them.
7. Connection establishment and termination.
These rules define how connections are established, maintained and terminated
when two nodes of a network want to communicate with each other.
8. Data security. Providing data security
and privacy is also built into most communication software packages. It
prevents access of data by unauthorized users.
9.
Log information. Several
communication software are designed to develop log information, which consists
of all jobs and data communications tasks that have taken place. Such
information may be used for charging the users of the network based on their
usage of the network resources.
The
effectiveness depends on four fundamental characteristics of data
communications
1.
Delivery: The data must be
deliver in correct order with correct destination.
2.
Accuracy: The data must be
deliver accurately.
3.
Timeliness: The data must be
deliver in a timely manner.late delivered Data useless.
4.
Jitter: It is the uneven delay
in the packet arrival time that cause uneven quality.
Abstraction in Java
·
Difficulty Level : Easy
·
Last Updated : 17 May, 2021
Data Abstraction is the property by virtue of
which only the essential details are displayed to the user. The trivial or the
non-essentials units are not displayed to the user. Ex: A car is viewed as a
car rather than its individual components.
Data Abstraction may also be defined as the
process of identifying only the required characteristics of an object ignoring
the irrelevant details. The properties and behaviors of an object differentiate
it from other objects of similar type and also help in classifying/grouping the
objects.
Consider a real-life example of a man driving
a car. The man only knows that pressing the accelerators will increase the
speed of car or applying brakes will stop the car, but he does not know about
how on pressing the accelerator the speed is actually increasing, he does not
know about the inner mechanism of the car or the implementation of the
accelerator, brakes, etc in the car. This is what abstraction is.
In
java, abstraction is achieved by interfaces and abstract classes. We can achieve 100% abstraction using
interfaces.
Abstract classes and Abstract methods :
1. An abstract class is a class that is declared
with abstract keyword.
2. An abstract method is a method that is
declared without implementation.
3. An abstract class may or may not have all
abstract methods. Some of them can be concrete methods
4. A method defined abstract must always be
redefined in the subclass, thus making overriding compulsory OR either make subclass
itself abstract.
5. Any class that contains one or more abstract
methods must also be declared with abstract keyword.
6. There can be no object of an abstract class.
That is, an abstract class can not be directly instantiated with the new operator.
7. An abstract class can have parameterized
constructors and default constructor is always present in an abstract class.
When to use abstract classes and abstract methods with an
example
There are situations in which we will want to
define a superclass that declares the structure of a given abstraction without
providing a complete implementation of every method. That is, sometimes we will
want to create a superclass that only defines a generalization form that will
be shared by all of its subclasses, leaving it to each subclass to fill in the
details.
Consider a classic “shape” example, perhaps
used in a computer-aided design system or game simulation. The base type is
“shape” and each shape has a color, size and so on. From this, specific types
of shapes are derived(inherited)-circle, square, triangle and so on — each of
which may have additional characteristics and behaviors. For example, certain
shapes can be flipped. Some behaviors may be different, such as when you want
to calculate the area of a shape. The type hierarchy embodies both the
similarities and differences between the shapes.
·
Java
|
// Java program to illustrate the // concept of Abstraction abstract class Shape { String color; // these are abstract methods abstract double area(); public abstract String toString(); // abstract class can have
constructor public Shape(String color) { System.out.println("Shape
constructor called"); this.color
= color; } // this is a concrete method public String getColor() {
return color; } } class Circle extends Shape { double radius; public Circle(String color,
double radius) { // calling
Shape constructor super(color); System.out.println("Circle
constructor called"); this.radius
= radius; } @Override double area() { return Math.PI *
Math.pow(radius, 2); } @Override public String toString() { return "Circle color
is " + super.getColor() +
"and area is : " + area(); } } class Rectangle extends Shape { double length; double width; public Rectangle(String
color, double length, double width) { // calling
Shape constructor super(color); System.out.println("Rectangle
constructor called"); this.length
= length; this.width
= width; } @Override double area() { return length * width; } @Override public String toString() { return "Rectangle
color is " + super.getColor() +
"and area is : " + area(); } } public class Test { public static void main(String[] args) { Shape s1 =
new
Circle("Red",
2.2); Shape s2 =
new
Rectangle("Yellow",
2, 4); System.out.println(s1.toString()); System.out.println(s2.toString()); } } |
Output
Shape constructor called
Circle constructor called
Shape constructor called
Rectangle constructor called
Circle color is Redand area is : 15.205308443374602
Rectangle color is Yellowand area is : 8.0
Encapsulation vs Data Abstraction
1. Encapsulation is data hiding(information hiding) while
Abstraction is detail hiding(implementation hiding).
2. While encapsulation groups together data and
methods that act upon the data, data abstraction deals with exposing the
interface to the user and hiding the details of implementation.
Advantages of Abstraction
1. It reduces the complexity of viewing the
things.
2. Avoids code duplication and increases
reusability.
3. Helps to increase security of an application
or program as only important details are provided to the user.
Encapsulation in Java
Encapsulation is defined
as the wrapping up of data under a single unit. It is the mechanism that binds
together code and the data it manipulates. Another way to think about
encapsulation is, it is a protective shield that prevents the data from being
accessed by the code outside this shield.
·
Technically
in encapsulation, the variables or data of a class is hidden from any other
class and can be accessed only through any member function of its own class in
which it is declared.
·
As
in encapsulation, the data in a class is hidden from other classes using the
data hiding concept which is achieved by making the members or methods of a
class private, and the class is exposed to the end-user or the world without
providing any details behind implementation using the abstraction concept, so
it is also known as a combination
of data-hiding and abstraction.
·
Encapsulation
can be achieved by Declaring all the variables in the class as private and
writing public methods in the class to set and get the values of variables
The program to access
variables of the class EncapsulateDemo is shown below:
Java
// Java program to demonstrate
encapsulation
class Encapsulate {
//
private variables declared
//
these can only be accessed by
//
public methods of class
private
String geekName;
private
int geekRoll;
private
int geekAge;
//
get method for age to access
//
private variable geekAge
public
int getAge() { return geekAge; }
//
get method for name to access
//
private variable geekName
public
String getName() { return geekName; }
//
get method for roll to access
//
private variable geekRoll
public
int getRoll() { return geekRoll; }
//
set method for age to access
//
private variable geekage
public
void setAge(int newAge) { geekAge = newAge; }
//
set method for name to access
//
private variable geekName
public
void setName(String newName)
{
geekName
= newName;
}
//
set method for roll to access
//
private variable geekRoll
public
void setRoll(int newRoll) { geekRoll = newRoll; }
}
public class TestEncapsulation {
public
static void main(String[] args)
{
Encapsulate
obj = new Encapsulate();
//
setting values of the variables
obj.setName("Harsh");
obj.setAge(19);
obj.setRoll(51);
//
Displaying values of the variables
System.out.println("Geek's
name: " + obj.getName());
System.out.println("Geek's
age: " + obj.getAge());
System.out.println("Geek's
roll: " + obj.getRoll());
//
Direct access of geekRoll is not possible
//
due to encapsulation
//
System.out.println("Geek's roll: " +
//
obj.geekName);
}
}
Output
Geek's name: Harsh
Geek's age: 19
Geek's roll: 51
In the above program, the class EncapsulateDemo is encapsulated
as the variables are declared as private. The get methods like getAge() ,
getName() , getRoll() are set as public, these methods are used to access these
variables. The setter methods like setName(), setAge(), setRoll() are also
declared as public and are used to set the values of the variables.
Advantages
of Encapsulation:
·
Data Hiding: The
user will have no idea about the inner implementation of the class. It will not
be visible to the user how the class is storing values in the variables. The
user will only know that we are passing the values to a setter method and
variables are getting initialized with that value.
·
Increased Flexibility: We
can make the variables of the class as read-only or write-know that only
depending on our requirement. If we wish to make the variables read-only then
we have to omit the setter methods like setName(), setAge(), etc. from the
above program or if we wish to make the variables as write-only then we have to
omit the get methods like getName(), getAge(), etc. from the above program
·
Reusability: Encapsulation
also improves the re-usability and easy to change with new requirements.
·
Testing code is easy: Encapsulated
code is easy to test for unit testing.
Explain
the working of simple java programs with appropriate diagrams
Structure
of Java Program
Java is an object-oriented
programming, platform-independent, and secure programming
language that makes it popular. Using the Java programming language, we can
develop a wide variety of applications. So, before diving in depth, it is
necessary to understand the basic
structure of Java program in detail. In this section, we
have discussed the basic structure
of a Java program. At the end of this section, you will able to
develop the Hello world Java program, easily.
Let's see which elements are included in
the structure of a Java program. A typical structure of a Java program
contains the following elements:
- Documentation Section
- Package Declaration
- Import Statements
- Interface Section
- Class Definition
- Class Variables and Variables
- Main Method Class
- Methods and Behaviors
Documentation Section
The documentation section is an
important section but optional for a Java program. It includes basic information about
a Java program. The information includes the author's name, date of creation,
version, program name, company name, and description of
the program. It improves the readability of the program. Whatever we write in
the documentation section, the Java compiler ignores the statements during the
execution of the program. To write the statements in the documentation section,
we use comments.
The comments may be single-line,
multi-line, and documentation comments.
- Single-line
Comment: It
starts with a pair of forwarding slash (//). For
example:
1. //First Java Program
- Multi-line
Comment: It
starts with a /* and
ends with */. We
write between these two symbols. For example:
1. /*It is an example of
2. multiline comment*/
- Documentation
Comment: It
starts with the delimiter (/**) and
ends with */.
For example:
1. /**It is an example of documentation comment*/
Package Declaration
The package declaration is optional. It
is placed just after the documentation section. In this section, we declare
the package name in
which the class is placed. Note that there can be only one package statement
in a Java program. It must be defined before any class and interface
declaration. It is necessary because a Java class can be placed in different
packages and directories based on the module they are used. For all these
classes package belongs to a single parent directory. We use the keyword package to
declare the package name. For example:
1. package javatpoint; //where javatpoint is the package name
2. package com.javatpoint; //where com is the root directory and javatpoint is the subdirectory
Import Statements
The package contains the many predefined
classes and interfaces. If we want to use any class of a particular package, we
need to import that class. The import statement represents the class stored in
the other package. We use the import keyword
to import the class. It is written before the class declaration and after the
package statement. We use the import statement in two ways, either import a specific
class or import all classes of a particular package. In a Java program, we can
use multiple import statements. For example:
1. import java.util.Scanner; //it imports the Scanner class only
2. import java.util.*; //it imports all the class of the java.util package
Interface Section
It is an optional section. We can create
an interface in
this section if required. We use the interface keyword to create an
interface. An interface is a slightly different from the class.
It contains only constants and method declarations.
Another difference is that it cannot be instantiated. We can use interface in
classes by using the implements keyword.
An interface can also be used with other interfaces by using the extends keyword.
For example:
Features of Java - Javatpoint
1. interface car
2. {
3. void start();
4. void stop();
5. }
Class Definition
In this section, we define the class. It
is vital part
of a Java program. Without the class, we cannot create any Java program. A Java
program may conation more than one class definition. We use the class keyword
to define the class. The class is a blueprint of a Java program. It contains
information about user-defined methods, variables, and constants. Every Java
program has at least one class that contains the main() method. For example:
1. class Student //class definition
2. {
3. }
Class Variables and Constants
In this section, we define variables and constants that
are to be used later in the program. In a Java program, the variables and
constants are defined just after the class definition. The variables and
constants store values of the parameters. It is used during the execution of
the program. We can also decide and define the scope of variables by using the
modifiers. It defines the life of the variables. For example:
1. class Student //class definition
2. {
3. String sname; //variable
4. int id;
5. double percentage;
6. }
Main Method Class
In this section, we define the main() method. It
is essential for all Java programs. Because the execution of all Java programs
starts from the main() method. In other words, it is an entry point of the
class. It must be inside the class. Inside the main method, we create objects
and call the methods. We use the following statement to define the main()
method:
1. public static void main(String args[])
2. {
3. }
For example:
1. public class Student //class definition
2. {
3. public static void main(String args[])
4. {
5. //statements
6. }
7. }
You can read more about the Java main()
method here.
Methods and behavior
In this section, we define the
functionality of the program by using the methods.
The methods are the set of instructions that we want to perform. These
instructions execute at runtime and perform the specified task. For example:
1. public class Demo //class definition
2. {
3. public static void main(String args[])
4. {
5. void display()
6. {
7. System.out.println("Welcome to javatpoint");
8. }
9. //statements
10.
}
11.
}
When we follow and use the above
elements in a Java program, the program looks like the following.
CheckPalindromeNumber.java
1. /*Program name: Palindrome*/
2. //Author's name: Mathew
3. /*Palindrome is number or string that will remains the same
4. When we write that in reverse order. Some example of
5. palindrome is 393, 010, madam, etc.*/
6. //imports the Scanner class of the java.util package
7. import java.util.Scanner;
8. //class definition
9. public class CheckPalindromeNumber
10.
{
11.
//main method
12.
public static void main(String args[])
13.
{
14.
//variables to be used in program
15.
int r, s=0, temp;
16.
int x; //It is the number variable to be checked for palindrome
17.
Scanner sc=new Scanner(System.in);
18.
System.out.println("Enter the number to check: ");
19.
//reading a number from the user
20.
x=sc.nextInt();
21.
//logic to check if the number id palindrome or not
22.
temp=x;
23.
while(x>0)
24.
{
25.
r=x%10; //finds remainder
26.
s=(s*10)+r;
27.
x=x/10;
28.
}
29.
if(temp==s)
30.
System.out.println("The given number is palindrome.");
31.
else
32.
System.out.println("The given number is not palindrome.");
33.
}
34.
}
Operators
in Java
Operator in Java is
a symbol which is used to perform operations. For example: +, -, *, / etc.
There are many types of operators in
Java which are given below:
- Unary Operator,
- Arithmetic Operator,
- Shift Operator,
- Relational Operator,
- Bitwise Operator,
- Logical Operator,
- Ternary Operator and
- Assignment Operator.
Java Operator Precedence
|
Operator Type |
Category |
Precedence |
|
Unary |
postfix |
expr |
|
prefix |
|
|
|
Arithmetic |
multiplicative |
|
|
additive |
|
|
|
Shift |
shift |
|
|
Relational |
comparison |
|
|
equality |
|
|
|
Bitwise |
bitwise AND |
|
|
bitwise exclusive OR |
|
|
|
bitwise inclusive OR |
|
|
|
Logical |
logical AND |
|
|
logical OR |
|
|
|
Ternary |
ternary |
|
|
Assignment |
assignment |
|
Java Unary Operator
The Java unary operators require only
one operand. Unary operators are used to perform various operations i.e.:
- incrementing/decrementing a value by
one
- negating an expression
- inverting the value of a boolean
Java Unary Operator Example: ++ and
--
1. class OperatorExample{
2. public static void main(String args[]){
3. int x=10;
4. System.out.println(x++);//10 (11)
5. System.out.println(++x);//12
6. System.out.println(x--);//12 (11)
7. System.out.println(--x);//10
8. }}
Output:
How to find Nth Highest Salary
in SQL
10121210
Java Unary Operator Example 2: ++
and --
1. class OperatorExample{
2. public static void main(String args[]){
3. int a=10;
4. int b=10;
5. System.out.println(a++ + ++a);//10+12=22
6. System.out.println(b++ + b++);//10+11=21
7.
8. }}
Output:
2221
Java Unary Operator Example: ~ and !
1. class OperatorExample{
2. public static void main(String args[]){
3. int a=10;
4. int b=-10;
5. boolean c=true;
6. boolean d=false;
7. System.out.println(~a);//-11 (minus of total positive value which starts from 0)
8. System.out.println(~b);//9 (positive of total minus, positive starts from 0)
9. System.out.println(!c);//false (opposite of boolean value)
10.
System.out.println(!d);//true
11.
}}
Output:
-119falsetrue
Java Arithmetic Operators
Java arithmatic operators are used to
perform addition, subtraction, multiplication, and division. They act as basic
mathematical operations.
Java Arithmetic Operator Example
1. class OperatorExample{
2. public static void main(String args[]){
3. int a=10;
4. int b=5;
5. System.out.println(a+b);//15
6. System.out.println(a-b);//5
7. System.out.println(a*b);//50
8. System.out.println(a/b);//2
9. System.out.println(a%b);//0
10.
}}
Output:
1555020
Java Arithmetic Operator Example:
Expression
1. class OperatorExample{
2. public static void main(String args[]){
3. System.out.println(10*10/5+3-1*4/2);
4. }}
Output:
21
Java Left Shift Operator
The Java left shift operator << is
used to shift all of the bits in a value to the left side of a specified number
of times.
Java Left Shift Operator Example
1. class OperatorExample{
2. public static void main(String args[]){
3. System.out.println(10<<2);//10*2^2=10*4=40
4. System.out.println(10<<3);//10*2^3=10*8=80
5. System.out.println(20<<2);//20*2^2=20*4=80
6. System.out.println(15<<4);//15*2^4=15*16=240
7. }}
Output:
408080240
Java Right Shift Operator
The Java right shift operator >>
is used to move left operands value to right by the number of bits specified by
the right operand.
Java Right Shift Operator Example
1. class OperatorExample{
2. public static void main(String args[]){
3. System.out.println(10>>2);//10/2^2=10/4=2
4. System.out.println(20>>2);//20/2^2=20/4=5
5. System.out.println(20>>3);//20/2^3=20/8=2
6. }}
Output:
252
Java Shift Operator Example:
>> vs >>>
1. class OperatorExample{
2. public static void main(String args[]){
3. //For positive number, >> and >>> works same
4. System.out.println(20>>2);
5. System.out.println(20>>>2);
6. //For negative number, >>> changes parity bit (MSB) to 0
7. System.out.println(-20>>2);
8. System.out.println(-20>>>2);
9. }}
Output:
55-51073741819
Java AND Operator Example: Logical
&& and Bitwise &
The logical && operator doesn't
check second condition if first condition is false. It checks second condition
only if first one is true.
The bitwise & operator always checks
both conditions whether first condition is true or false.
1. class OperatorExample{
2. public static void main(String args[]){
3. int a=10;
4. int b=5;
5. int c=20;
6. System.out.println(a<b&&a<c);//false && true = false
7. System.out.println(a<b&a<c);//false & true = false
8. }}
Output:
falsefalse
Java AND Operator Example: Logical
&& vs Bitwise &
1. class OperatorExample{
2. public static void main(String args[]){
3. int a=10;
4. int b=5;
5. int c=20;
6. System.out.println(a<b&&a++<c);//false && true = false
7. System.out.println(a);//10 because second condition is not checked
8. System.out.println(a<b&a++<c);//false && true = false
9. System.out.println(a);//11 because second condition is checked
10.
}}
Output:
false10false11
Java OR Operator Example: Logical ||
and Bitwise |
The logical || operator doesn't check
second condition if first condition is true. It checks second condition only if
first one is false.
The bitwise | operator always checks
both conditions whether first condition is true or false.
1. class OperatorExample{
2. public static void main(String args[]){
3. int a=10;
4. int b=5;
5. int c=20;
6. System.out.println(a>b||a<c);//true || true = true
7. System.out.println(a>b|a<c);//true | true = true
8. //|| vs |
9. System.out.println(a>b||a++<c);//true || true = true
10.
System.out.println(a);//10 because second condition is not checked
11.
System.out.println(a>b|a++<c);//true | true = true
12.
System.out.println(a);//11 because second condition is checked
13.
}}
Output:
truetruetrue10true11
Java Ternary Operator
Java Ternary operator is used as one
liner replacement for if-then-else statement and used a lot in Java
programming. it is the only conditional operator which takes three operands.
Java Ternary Operator Example
1. class OperatorExample{
2. public static void main(String args[]){
3. int a=2;
4. int b=5;
5. int min=(a<b)?a:b;
6. System.out.println(min);
7. }}
Output:
2
Another Example:
1. class OperatorExample{
2. public static void main(String args[]){
3. int a=10;
4. int b=5;
5. int min=(a<b)?a:b;
6. System.out.println(min);
7. }}
Output:
5
Java Assignment Operator
Java assignment operator is one of the
most common operator. It is used to assign the value on its right to the
operand on its left.
Java Assignment Operator Example
1. class OperatorExample{
2. public static void main(String args[]){
3. int a=10;
4. int b=20;
5. a+=4;//a=a+4 (a=10+4)
6. b-=4;//b=b-4 (b=20-4)
7. System.out.println(a);
8. System.out.println(b);
9. }}
Output:
1416
Java Assignment Operator Example
1. class OperatorExample{
2. public static void main(String[] args){
3. int a=10;
4. a+=3;//10+3
5. System.out.println(a);
6. a-=4;//13-4
7. System.out.println(a);
8. a*=2;//9*2
9. System.out.println(a);
10.
a/=2;//18/2
11.
System.out.println(a);
12.
}}
Output:
139189
Java Assignment Operator Example:
Adding short
1. class OperatorExample{
2. public static void main(String args[]){
3. short a=10;
4. short b=10;
5. //a+=b;//a=a+b internally so fine
6. a=a+b;//Compile time error because 10+10=20 now int
7. System.out.println(a);
8. }}
Output:
Compile time error
After type cast:
1. class OperatorExample{
2. public static void main(String args[]){
3. short a=10;
4. short b=10;
5. a=(short)(a+b);//20 which is int now converted to short
6. System.out.println(a);
7. }}
Output:
20
Basic
Math Functions
The java.lang.Math contains a set of basic math
functions for obtaining the absolute value, highest and lowest of two values,
rounding of values, random values etc. These basic math functions of the
Java Math class will be covered in the following sections.
Math.abs()
The Math.abs() function returns the absolute value
of the parameter passed to it. The absolute value is the positive value of the
parameter. If the parameter value is negative, the negative sign is removed and
the positive value corresponding to the negative value without sign is
returned. Here are two Math.abs() method examples:
intabs1 = Math.abs(10);// abs1 = 10
intabs2 = Math.abs(-20);// abs2 = 20
The absolute value of 10 is 10. The
absolute value of -20 is 20.
The Math.abs() method is overloaded in 4
versions:
Math.abs(int)
Math.abs(long)
Math.abs(float)
Math.abs(double)
Which of these methods are called
depends on the type of the parameter passed to the Math.abs() method.
Math.ceil()
The Math.ceil() function
rounds a floating point value up to the nearest integer value. The rounded
value is returned as a double. Here is a Math.ceil() Java
example:
doubleceil= Math.ceil(7.343);// ceil = 8.0
After executing this Java code the ceil variable will contain the
value 8.0 .
Math.floor()
The Math.floor() function
rounds a floating point value down to the nearest integer value. The rounded
value is returned as a double. Here is a Math.floor() Java
example:
doublefloor= Math.floor(7.343);// floor = 7.0
After executing this Java code the ceil variable will contain the
value 8.0 .
Math.floorDiv()
The Math.floorDiv() method
divides one integer (int or long) by another, and rounds the result down
to the nearest integer value. If the result is positive, the effect is the same
as using the Java / division
operator described earlier in this text.
If the result is negative, however, the
result is not the same. With the / division operator the fractions
are simply truncated. For positive numbers this corresponds to rounding down.
For negative numbers though, truncating the fractions correspond to rounding
up. The floorDiv() method
rounds down to the nearest negative integer, instead of the rounding up that
would occur with fraction truncation.
Here is a Math.floorDiv() Java
example:
doubleresult3 = Math.floorDiv(-100,9);
System.out.println("result3: "+ result3);
doubleresult4 =-100/9;
System.out.println("result4: "+ result4);
The output printed from this Java code
is:
Output:
Command
Prompt
result3: -12.0
result4: -11.0
This shows the difference between
the / division
operator and Math.floorDiv() .
Math.min()
The Math.min() method returns the smallest of two
values passed to it as parameter. Here is a Math.min() Java example:
intmin = Math.min(10,20);
After executing this code the min variable will contain the value
10.
Math.max()
The Math.max() method returns the largest of two
values passed to it as parameter. Here is a Math.max() Java example:
intmax = Math.max(10,20);
After executing this code the max variable will contain the value
20.
Math.round()
The Math.round() method
rounds a float or double to the nearest integer using
normal math round rules (either up or down). Here is a Java Math.round() example:
doubleroundedDown = Math.round(23.445);
doubleroundedUp = Math.round(23.545);
After executing these two Java
statements the roundedDown variable
will contain the value 23.0 , and the roundedUp variable will contain the
value 24.0.
Math.random()
The Math.random() method
returns a random floating point number between 0 and 1. Of course the number is
not fully random, but the result of some calculation which is supposed to make
it as unpredictable as possible. Here is a Java Math.random() example:
doublerandom = Math.random();
To get a random value between 0 and e.g.
100, multiply the value returned by Math.random() with the
maximum number (e.g. 100). Here is an example of how that might look:
doublerandom = Math.random() *100D;
If you need an integer value, use
the round(), floor() or ceil() method.
Exponential and Logarithmic Math Functions
The Java Math class also contains a set of
functions intended for exponential and logarithmic calculations. I will cover
some of these math functions in the following sections.
Math.exp()
The Math.exp() function returns e (Euler's
number) raised to the power of the value provided as parameter. Here is a
Java Math.exp() example:
doubleexp1 = Math.exp(1);
System.out.println("exp1 = "+ exp1);
doubleexp2 = Math.exp(2);
System.out.println("exp2 = "+ exp2);
When this Java math code is executed it
will print this output:
Output:
Command
Prompt
exp1 = 2.718281828459045
exp2 = 7.38905609893065
Math.log()
The Math.log() method provides the logarithm of
the given parameter. The base for the logarithm is i (Euler's
number). Thus, Math.log() provides
the reverse function of Math.exp(). Here is a Java Math.log() example:
doublelog1 = Math.log(1);
System.out.println("log1 = "+ log1);
doublelog10= Math.log(10);
System.out.println("log10 = "+log10);
The output from this Math.log() example is:
Output:
Command
Prompt
log1 = 0.0
log10 = 2.302585092994046
Math.log10()
The Math.log10 method works like the Math.log() method except is uses 10 as is
base for calculating the logarithm instead of e (Euler's
Number). Here is a Math.log10() Java
example:
doublelog10_1 = Math.log10(1);
System.out.println("log10_1 = "+log10_1);
doublelog10_100 = Math.log10(100);
System.out.println("log10_100 = "+log10_100);
The output printed from this Java Math.log10() example
would be:
Output:
Command
Prompt
log10_1 = 0.0
log10_100 = 2.0
Math.pow()
The Math.pow() function takes two parameters. The
method returns the value of the first parameter raised to the power of the
second parameter. Here is a Math.pow() Java example:
doublepow2 = Math.pow(2,2);
System.out.println("pow2 = "+ pow2);
doublepow8 = Math.pow(2,8);
System.out.println("pow8 = "+ pow8);
The output from this Math.pow() example would be:
Output:
Command
Prompt
pow2 = 4.0
pow8 = 256.0
In other words, the Math.pow() example calculate the values of
22 and 28 which are 4
and 256.
Math.sqrt()
The Math.sqrt() method
calculates the square root of the parameter given to it. Here are a few
Java Math.sqrt() example:
doublesqrt4 = Math.sqrt(4);
System.out.println("sqrt4 = "+ sqrt4);
doublesqrt9 = Math.sqrt(9);
System.out.println("sqrt9 = "+ sqrt9);
The output printed from these Java Math.sqrt() examples
would be:
Output:
Command
Prompt
sqrt4 = 2.0
sqrt9 = 3.0
Trigonometric Math Functions
The Java Math class contains a set of
trigonometric functions. These functions can calculate values used in
trigonometry, like sine, cosine, tangens etc. I will cover the most used
trigonometry functions in the following sections. If you are looking for a
trigonometric function and you cannot find it here, check the JavaDoc for the
Java Math class.
The Math class just
might have the function you are looking for, even if I have not described it
here.
Math.PI
The Math.PI constant is a double with a value that is very close to
the value of PI - the mathematical definition of PI. You will often need
the Math.PI field when
making trigonometric calculations.
Math.sin()
The Math.sin() method calculates the sine value
of some angle value in radians. Here is a Java Math.sin() example:
doublesin= Math.sin(Math.PI);
System.out.println("sin = "+sin);
Math.cos()
The Math.cos() method calculates the cosine value
of some angle value in radians. Here is a Java Math.cos() example:
doublecos= Math.cos(Math.PI);
System.out.println("cos = "+cos);
Math.tan()
The Math.tan() method calculates the tangens
value of some angle value in radians. Here is a Java Math.tan() example:
doubletan= Math.tan(Math.PI);
System.out.println("tan = "+tan);
Math.asin()
The Math.asin() method
calculates the arc sine value of a value between 1 and -1. Here is a Java Math.asin() example:
doubleasin= Math.asin(1.0);
System.out.println("asin = "+asin);
Math.acos()
The Math.acos() method
calculates the arc cosine value of a value between 1 and -1. Here is a
Java Math.acos() example:
doubleacos= Math.acos(1.0);
System.out.println("acos = "+acos);
Math.atan()
The Math.atan() method
calculates the arc tangens value of a value between 1 and -1. Here is a
Java Math.atan() example:
doubleatan= Math.atan(1.0);
System.out.println("atan = "+atan);
Math.atan2()
I am not exactly sure what Math.atan2() method does
mathematically. Here is what the JavaDoc says:
"Returns the angle theta from the
conversion of rectangular coordinates (x, y) to polar coordinates (r,
theta)".
If you need this method, please read the
JavaDoc. But now you know at least that it exists.
Math.sinh()
The Math.sinh() method
calculates the hyperbolic sine value of a value between 1 and -1. Here is a
Java Math.sinh() example:
doublesinh= Math.sinh(1.0);
System.out.println("sinh = "+sinh);
Math.cosh()
The Math.cosh() method
calculates the hyperbolic cosine value of a value between 1 and -1. Here is a
Java Math.cosh() example:
doublecosh= Math.cosh(1.0);
System.out.println("cosh = "+cosh);
Math.tanh()
The Math.tanh() method
calculates the hyperbolic tangens value of a value between 1 and -1. Here is a
Java Math.tanh() example:
doubletanh= Math.tanh(1.0);
System.out.println("tanh = "+tanh);
Math.toDegrees()
The Math.toDegrees() method
converts an angle in radians to degrees. Here is a Java Math.toDegrees() example:
doubledegrees = Math.toDegrees(Math.PI);
System.out.println("degrees = "+ degrees);
Math.toRadians()
The Math.toRadians() method
converts an angle in degrees to radians. Here is a Java Math.toRadians() example:
doubleradians = Math.toRadians(
Java Tokens
·
Last Updated : 17 Feb, 2021
A token is
the smallest element of a program that is meaningful to the compiler. Tokens
can be classified as follows:
1.
Keywords
2.
Identifiers
3.
Constants
4.
Special
Symbols
5.
Operators
1.
: Keywords are pre-defined or reserved words in a programming
language. Each keyword is meant to perform a specific function in a program.
Since keywords are referred names for a compiler, they can’t be used as
variable names because by doing so, we are trying to assign a new meaning to
the keyword which is not allowed. Java language
supports following keywords:
2.
3. abstract assert boolean
4. break byte case
5. catch char class
6. const continue default
7. do double else
8. enum exports extends
9. final finally float
10. for goto if
11. implements import instanceof
12. int interface long
13. module native new
14. open opens package
15. private protected provides
16. public requires return
17. short static strictfp
18. super switch synchronized
19. this throw throws
20. to transient transitive
21. try uses void
22. volatile while with
23.
Identifi ers: Identifiers are used as the general
terminology for naming of variables, functions and arrays. These are
user-defined names consisting of an arbitrarily long sequence of letters and
digits with either a letter or the underscore(_) as a first character.
Identifier names must differ in spelling and case from any keywords. You cannot
use keywords as identifiers; they are reserved for special use. Once declared,
you can use the identifier in later program statements to refer to the
associated value. A special kind of identifier, called a statement label, can
be used in goto statements.
Examples
of valid identifiers :
MyVariableMYVARIABLEmyvariablexix1i1_myvariable$myvariablesum_of_arraygeeks123
Examples
of invalid identifiers :
My Variable // contains a space123geeks // Begins with a digita+c // plus sign is not an alphanumeric charactervariable-2 // hyphen is not an alphanumeric charactersum_&_difference // ampersand is not an alphanumeric character
24.
Constants/Literals: Constants are also like normal
variables. But, the only difference is, their values can not be modified by the
program once they are defined. Constants refer to fixed values. They are also
called as literals.
Constants may belong to any of the
data type.
Syntax:
final data_type variable_name;
25.
Special Symbols: The following special symbols are used
in Java having some special meaning and thus, cannot be used for some other
purpose.
[] () {}, ; * =
·
Brackets[]: Opening and closing brackets are
used as array element reference. These indicate single and multidimensional
subscripts.
·
Parentheses(): These special symbols are used to
indicate function calls and function parameters.
·
Braces{}: These opening and ending curly
braces marks the start and end of a block of code containing more than one
executable statement.
·
comma (, ): It is used to separate more than
one statements like for separating parameters in function calls.
·
semi colon : It is an operator that
essentially invokes something called an initialization list.
·
asterick (*): It is used to create pointer
variable.
·
assignment operator: It is used to assign values.
26.
Operators: Java provides many types of operators
which can be used according to the need. They are classified based on the
functionality they provide. Some of the types are-
10.
Precedence
and Associativity
Importance Of Java To The Internet Computer Science Essay
Java
is a programmer’s language.
Java
is cohesive and consistent.
Except
for those constraints imposed by the Internet environment Java gives the
programmer full control.
Java
is to Internet programming where C was to system programming.
Importance of Java to the Internet
Java
has had a profound effect on the Internet because it allows objects to move
freely in Cyberspace. In a network there are two categories of objects that are
transmitted between the Server and the Personal computer.
Passive
information
Dynamic
active programs
The
Dynamic Self-executing programs cause serious problems in the areas of Security
and probability. But Java addresses those concerns and by doing so has opened
the door to an exciting new form of program called the Applet.
Get Help With Your Essay
If you need assistance with writing your essay, our professional
essay writing service is here to help!
Java can be used to create two types of programs
Applications:
An application is a program that runs on our Computer under the operating
system of that computer. It is more or less like one creating using C or C++.
Java’s ability to create Applets makes it important.
Applet:
An Applet is an application designed to be transmitted over the Internet and
executed by a Java compatible web browser. An applet is actually a tiny Java
program, dynamically downloaded across the network, just like an image. But the
difference is it is an intelligent program, not just a media file. It can react
to the user input and dynamically change.
Features of Java Security
Every
time you that you download a program you are risking a viral infection. Prior
to Java, most users did not download executable programs frequently and most
users were worried about the possibility of infecting their systems with a
virus. Java answers both these concerns by providing a “firewall” between a
network application and your computer. When you use a Java-compatible Web
browser, you can safely download Java applets without fear of virus infection.
Portability
For
programs to be dynamically downloaded to all the various types of platforms
connected to the Internet, some means of generating portable executable code is
needed .As you will see, the same mechanism that helps ensure security also
helps create portability. Indeed Java’s solution to these two problems is both
elegant and efficient.
Java Virtual Machine (JVM)
Beyond
the language there is the Java virtual machine. The Java virtual machine is an
important element of the Java technology. The virtual machine can be embedded
within a web browser or an operating system. Once a piece of Java code is
loaded onto a machine, it is verified. As part of the loading process, a class
loader is invoked and does byte code verification makes sure that the code
that’s has been generated by the compiler will not corrupt the machine that
it’s loaded on. Byte code verification takes place at the end of the
compilation process to make sure that is all accurate and correct
Java Architecture
Java
architecture provides a portable, robust, high performing environment for
development. Java provides portability by compiling the byte codes for the Java
Virtual Machine, which is then interpreted on each platform by the run-time
environment
Compilation of code
When
you compile the code, the Java compiler creates machine code (called byte code)
for a hypothetical machine called Java Virtual Machine (JVM). The JVM is
supposed to execute the byte code. The JVM is created for overcoming the issue
of portability. The code is written and compiled for one machine and
interpreted on all machines. This machine is called Java Virtual Machine.
Simple
Java
was designed to be easy for the Professional programmer to learn and to use
effectively. If you are an experienced C++ programmer, learning Java will be
even easier. Because Java inherits the C/C++ syntax and many of the objects
oriented features of C++. Most of the confusing concepts from C++ are either
left out of Java or implemented in a cleaner, more approachable manner
Object-Oriented
Java was not designed to be source-code compatible with any other
language. This allowed the Java team the freedom to design with a blank slate.
One outcome of this was a clean usable, pragmatic approach to objects. The
object model in Java is simple and easy to extend while simple types such as
integers are kept as high-performance non-objects.
Robust
The
multi-platform environment of the Web places extraordinary demands on a
program, because the program must execute reliably in a variety of systems. The
ability to create robust programs was given a high priority in the design of
Java. Java is strictly typed language; it checks your code at compile time and
run time. Java virtually eliminates the problems of memory management and
de-allocation, which is completely automatic. In a well-written Java program,
all run time errors can -and should -be managed by your program.
SERVLETS
Introduction
The Java web server is JavaSoft’s own web Server. The Java web server
is just a part of a larger framework, intended to provide you not just with a
web server, but also with tools. To build customized network servers for any
Internet or Intranet client/server system. Servlets are to a web server, how
applets are to the browser.
About
Servlets
Servlets
provide a Java-based solution used to address the problems currently associated
with doing server-side programming, including inextensible scripting solutions,
platform-specific APIs, and incomplete interfaces.
Servlets
are objects that conform to a specific interface that can be plugged into a
Java-based server. Servlets are to the server-side what applets are to the
client-side – object byte codes that can be dynamically loaded off the net.
They differ from applets in that they are faceless objects (without graphics or
a GUI component). They serve as platform independent, dynamically loadable,
pluggable helper byte code objects on the server side that can be used to
dynamically extend server-side functionality.
For
example, an HTTP Servlets can be used to generate dynamic HTML content. When
you use Servlets to do dynamic content you get the following advantages:
They’re
faster and cleaner than CGI scripts
They
use a standard API (the Servlets API)
They
provide all the advantages of Java (run on a variety of servers without needing
to be rewritten)
There
are many features of Servlets that make them easy and attractive to use.
Easily
configured using the GUI-based Admin tool
Can
be loaded and invoked from a local disk or remotely across the network.
Can
be linked together, or chained, so that one Servlets can call another Servlets,
or several Servlets in sequence.
Can
be called dynamically from within HTML pages, using server-side include tags.
Are
secure – even when downloading across the network, the Servlets security model
and Servlets sandbox protect your system from unfriendly behavior.
Advantages of the Servlet API
One
of the great advantages of the Servlet API is protocol independence. It assumes
nothing about:
The
protocol being used to transmit on the net
How
it is loaded
The
server environment it will be running in
Features of Servlets:
Servlets
are persistent. Servlet are loaded only by the web server and can maintain
services between requests.
Servlets
are fast. Since Servlets only need to be loaded once, they offer much better
performance over their CGI counterparts.
Servlets
are platform independent.
Servlets
are extensible. Java is a robust, object-oriented programming language, which
easily can be extended to suit your needs
Invoking
Servlets
A
Servlet invoker is a Servlet that invokes the “service” method on a named
Servlet. If the Servlet is not loaded in the server, then the invoker first
loads the Servlet (either from local disk or from the network) and the then
invokes the “service” method. Also like applets, local Servlets in the server
can be identified by just the class name. In other words, if a Servlet name is
not absolute, it is treated as local.
A
client can invoke Servlets in the following ways:
The
client can ask for a document that is served by the Servlet.
The
client (browser) can invoke the Servlet directly using a URL, once it has been
mapped using the Servlet Aliases section of the admin GUI.
The
Servlet can be invoked through server side include tags.
The
Servlet can be invoked by placing it in the Servlets/ directory.
The
Servlet can be invoked by using it in a filter chain.
Java Database Connectivity
What
Is JDBC?
JDBC
is a Java API for executing SQL statements. (As a point of interest, JDBC is a
trademarked name and is not an acronym; nevertheless, JDBC is often thought of
as standing for Java Database Connectivity. It consists of a set of classes and
interfaces written in the Java programming language. JDBC provides a standard
API for tool/database developers and makes it possible to write database
applications using a pure Java API.
Using
JDBC, it is easy to send SQL statements to virtually any relational database.
One can write a single program using the JDBC API, and the program will be able
to send SQL statements to the appropriate database. The combinations of Java
and JDBC lets a programmer write it once and run it anywhere.
What
Does JDBC Do?
Simply put, JDBC makes it possible to do three things:
Establish
a connection with a database
Send
SQL statements
Process
the results.
JDBC
versus ODBC and other APIs
At
this point, Microsoft’s ODBC (Open Database Connectivity) API is that probably
the most widely used programming interface for accessing relational databases.
It offers the ability to connect to almost all databases on almost all
platforms.
So
why not just use ODBC from Java? The answer is that you can use ODBC from Java,
but this is best done with the help of JDBC in the form of the JDBC-ODBC
Bridge, which we will cover shortly. The question now becomes “Why do you need
JDBC?” There are several answers to this question:
ODBC
is not appropriate for direct use from Java because it uses a C interface.
Calls from Java to native C code have a number of drawbacks in the security,
implementation, robustness, and automatic portability of applications.
A
literal translation of the ODBC C API into a Java API would not be desirable.
For example, Java has no pointers, and ODBC makes copious use of them,
including the notoriously error-prone generic pointer “void *”. You can think
of JDBC as ODBC translated into an object-oriented interface that is natural
for Java programmers.
ODBC
is hard to learn. It mixes simple and advanced features together, and it has
complex options even for simple queries. JDBC, on the other hand, was designed
to keep simple things simple while allowing more advanced capabilities where
required.
A
Java API like JDBC is needed in order to enable a “pure Java” solution. When
ODBC is used, the ODBC driver manager and drivers must be manually installed on
every client machine. When the JDBC driver is written completely in Java,
however, JDBC code is automatically installable, portable, and secure on all
Java platforms from network computers to mainframes.
Two-tier
and three-tier Models
The
JDBC API supports both two-tier and three-tier models for database access.
In
the two-tier model, a Java applet or application talks directly to the
database. This requires a JDBC driver that can communicate with the particular
database management system being accessed. A user’s SQL statements are
delivered to the database, and the results of those statements are sent back to
the user. The database may be located on another machine to which the user is
connected via a network. This is referred to as a client/server configuration,
with the user’s machine as the client, and the machine housing the database as
the server. The network can be an Intranet, which, for example, connects
employees within a corporation, or it can be the Internet.
JAVA
Application
JDBC
DBMS
Client machine
DBMS-proprietary protocol
Database server
Java applet or
Html browser
Application
Server (Java)
JDBC
DBMS
Client machine (GUI)
HTTP, RMI, or CORBA calls
Server machine (business Logic)
DBMS-proprietary protocol
Database server
In
the three-tier model, commands are sent to a “middle tier” of services, which
then send SQL statements to the database. The database processes the SQL
statements and sends the results back to the middle tier, which then sends them
to the user. MIS directors find the three-tier model very attractive because
the middle tier makes it possible to maintain control over access and the kinds
of updates that can be made to corporate data. Another advantage is that when
there is a middle tier, the user can employ an easy-to-use higher-level API
which is translated by the middle tier into the appropriate low-level calls.
Finally, in many cases the three-tier architecture can provide performance
advantages.
Until
now the middle tier has typically been written in languages such as C or C++,
which offer fast performance. However, with the introduction of optimizing
compilers that translate Java byte code into efficient machine-specific code,
it is becoming practical to implement the middle tier in Java. This is a big
plus, making it possible to take advantage of Java’s robustness, multithreading,
and security features. JDBC is important to allow database access from a Java
middle tier.
Java if-else Statement
The Java if-else statement also tests the condition. It executes the if block if condition is true otherwise else block is executed. ,
Syntax:
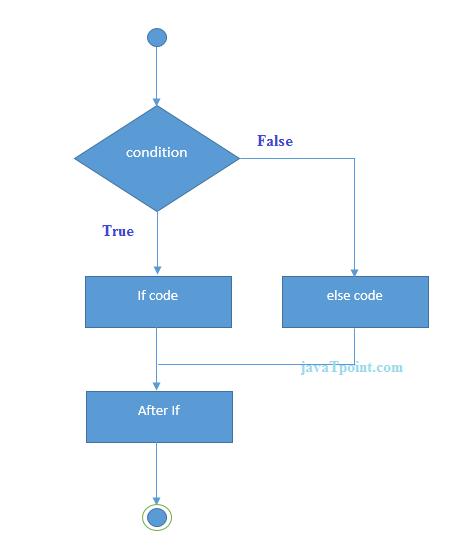
Example:
Output:
odd number
Leap Year Example:
A year is leap, if it is divisible by 4 and 400. But, not by 100.
Output:
LEAP YEAR
Using Ternary Operator
We can also use ternary operator (? :) to perform the task of if...else statement. It is a shorthand way to check the condition. If the condition is true, the result of ? is returned. But, if the condition is false, the result of : is returned.
Output:
odd number
Java Nested if statement
The nested if statement represents the if block within another if block. Here, the inner if block condition executes only when outer if block condition is true.
Syntax:
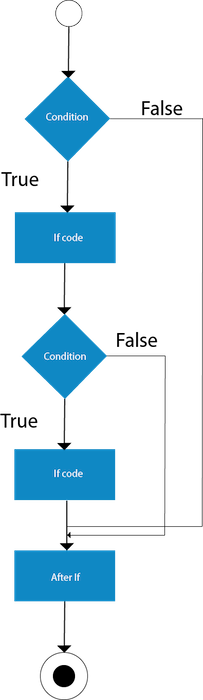
Example:
Output:
You are eligible to donate blood
Example 2:
Jump Statements in Java Example
In Java, Jump statements are used to unconditionally transfer program control from one point to elsewhere in the program. Jump statements are primarily used to interrupt loop or switch-case instantly. Java supports three jump statements: break, continue, and return.
We’ll be covering the following topics in this tutorial:
THE break Statement
The break construct is used to break out of the middle of loops: for, do, or while loop. When a break statement is encountered, execution of the current loops immediately stops and resumes at the first statement following the current loop. That is, we can force immediate termination of a loop, bypassing any remaining code in the body of the loop.It is mostly used to exit early from the loop by skipping the remaining statements of loop or switch control structures. It is simply written as
break;
• We can have more than one break statement in a loop.
• The break command terminates only the current loop and not any enclosing loops.
class BreakStatement {
public static void main(String args[]){
System.out.println(“Show importance of break statement”);
for(int i =1; i<=10; i++){
System.out.println(“i = “+i);
if(i==5){
System.out.println(“\nBye”);
break;
}
}
}
}
Output: Show importance of break statement 1 2 3 4 5
i = 1
i = 2
i = 3
i = 4
i = 5
Output:
Bye
Explaination: In this program, the for loop executed starting from i = 1 to 10 in steps of 1. Now when the condition (i==5) in the body of the loop is satisfied, the break statement causes the control to move out of for loop.
Program to input indefinite numbers and then calculate the sum of only the positive numbers. The program terminates when negative number is input?
//program to show sum of indefinite numbers
import java.util.scanner;//program user scanner class
public class SumIndefinite {
public static void main(String[] args){
int num, sum =0;
//Create Scanner object to obtain input from keyboard
Scanner input =newScanner(system.in);
system.out.print(“Enter numbers(negative number to quit) —>”);
while(true){
num = input.nextInt();//Read number
if(num <0)
break;
sum += num;
}
system.out.println(“Sum is —–>”+sum);
}
}
Output: Enter numbers(negative number to quit) —> 50 21 33 17 -1
Sum is —>121
Explanation: This program computes the sum of positive numbers input by the user. When a negative number is an input, the condition (num < 0) become true and break statement executed which leads to the termination of the while loop and the next statement following the loop executed which displays the sum of positive numbers. The condition of the while loop always remains true as we have specified a non-zero value 1 which makes it run infinitely. The only way to exit this loop is to use a break statement.
In the nested loops, if the break statement occurs in the inner loop then the control is transferred only out of the inner loop, and it has nothing to do with the rest of the surrounding looping statements. However, in some cases, we need to jump not only out of the inner loop but also from the outer loop(s). In such a case, Java provides another form of break statement known as a labeled break statement. It allows you to specify from which loop you want to break. The labeled break statement enables you to jump immediately to the statement following the end of any enclosing statement block or loop that is identified by the label in the labeled break statement regardless of how many levels of nested blocks are there.
Before you use a labeled break statement, one should label the statement block or loop you want to exit from. To label a block or loop, you put a label (i.e.label name) followed by a colon at the start of it. Once you have labeled a block or loop, you can use this label along with the break statement. The general form of the labeled break statement is
break label;
On execution, it causes to exit out of the labeled block or loop and resume with the next statement after the labeled break or loop.
Using break as a form of Goto
The break statement can also be used to act as another form of the goto statement. Java does not have a goto statement, as it leads to unstructured programming which is less readable. To come out of a deeply nested set of loops, we can use the labeled break statement. We can also use it to break out of one or more blocks of code. We can also specify precisely the location from where execution should resume because this form of break works with a label as shown :
break label;
the label is the name of a label that identifies a block of code. When this form of break executes, control transferred out of the named block of code. The labeled block of code must enclose the break statement, but it does not need to be the immediately enclosing block. However, we cannot use a break to transfer control to a block of code that does not enclose the break statement.
To name a block, put a label at the start of it. A label is any valid Java identifier followed by a colon. Once we have labeled a block, we can then use this label as the target of a break statement. Doing so causes execution to resume at the end of the labeled block.
THE continue STATEMENT
Like the break statement, the continue statement also skips the remaining statements of the body of the loop where it is defined but instead of terminating the loop, the control is transferred to the beginning of the loop for next iteration. The loop continues until the test condition of the loop becomes false.
When used in the while and do-while loops, the continue statement causes the test condition to be evaluated immediately after it. But in case of for loop, the increment/decrement expression evaluates immediately after the continue statement and then the test condition is evaluated.
It is simply written as
continue;
/* Print Number from 1 to 10 Except 5 */
class NumberExcept {
public static void main(String args[] ) {
int i;
for(i=1;i<=10;i++) {
if(i==5) continue;
System.out.print(i +” “);
}
}
}
Above program will display the value of variable i from 1 to 4. When the value of variable i becomes 5, continue statement will skip the body of the loop following continue statement i.e. it skips System.out.println(i) statement and again executes the loop with the next iteration (value) i.e .. 6.
THE Return Statement
This statement is mainly used in methods in order to terminate a method in between and return back to the caller method. It is an optional statement. That is, even if a method doesn’t include a return statement, control returns back to the caller method after execution of the method. Return statement mayor may not return parameters to the caller method.
Palindrome Program in Java
Palindrome number in java: A palindrome number is a number that is same after reverse. For example 545, 151, 34543, 343, 171, 48984 are the palindrome numbers. It can also be a string like LOL, MADAM etc.
Palindrome number algorithm
- Get the number to check for palindrome
- Hold the number in temporary variable
- Reverse the number
- Compare the temporary number with reversed number
- If both numbers are same, print "palindrome number"
- Else print "not palindrome number"
Let's see the palindrome program in java. In this java program, we will get a number variable and check whether number is palindrome or not.
Output:
palindrome number
Palindrome Program in Java (Another way)
You can also use a method where number or string is not predefined. Here, user has to put the number or string as input to check if the number/string is palindrome.
Output:
Use image PalindromeExample
Perfect Number
In mathematics, a perfect number is a positive integer that is equal to the sum of its positive divisors, excluding the number itself.
For example, 6 is a positive number that is completely divisible by 1, 2, and 3. We know that the number is also divisible by itself but we will include it in the addition of divisors. When we add these divisors (1 + 2 + 3 = 6), it produces 6, which is equal to the number that we have considered. So, we can say that 6 is a perfect number.
There are two ways to find the perfect number:
- Using for Loop
- Using while Loop
Using for Loop
Write a C program that accepts an input from the user and checks the given number is a perfect or not.
Output
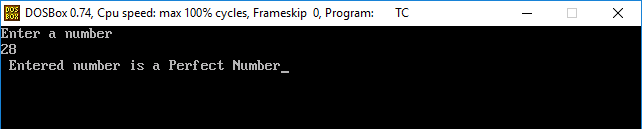
In the above output, the loop condition is validated at each iteration and counter i is incremented by 1. Inside the loop, various operations are performed such as:
Step 1: i = 1, rem = num % i, => 28 % 1 = 0. Here rem = 0.
Step 2: rem == 0, condition true.
Step 3: sum = 0 + i, sum = 0 + 1 => 1
// i is incremented by 1
Step 4: i = 2, rem = num % i, => 28 % 2 = 0. Here rem != 0, Condition is true;
Sum = 1 + i => 1 +2 = 3
Step 5: i = 3, rem = num % i, => 28 % 3 = 1. Here rem = 0, Condition is false;
Step 6: i = 4, rem = num % i, => 28 % 4 = 0. Here rem == 0, Condition is true;
Sum = 1 + i => 3 + 4 = 7
Similarly, check all condition;
Step 7: Sum == num, 28 == 28, Print the message "Entered number is a Perfect Number"
Using while Loop
Example 2: Let's create a C Program to find the perfect number using a while loop.
Output

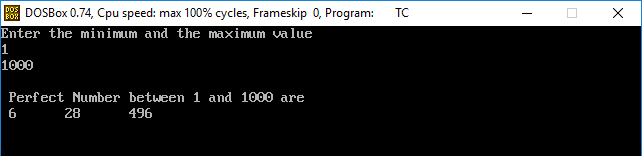
Example 3: Find the perfect number between two numbers through a C program.
Armstrong number in C
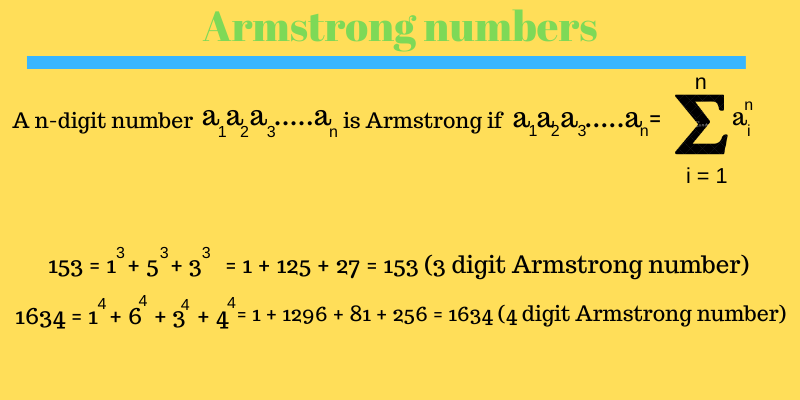
Armstrong number C program to check whether a number is an Armstrong number or not, it's a number that is equal to the sum of digits raise to the power total number of digits in the number. Some Armstrong numbers are: 0, 1, 2, 3, 153, 370, 407, 1634, 8208, etc. Read more about Armstrong numbers. We will consider base ten numbers in our program. The algorithm to do this is: First, we calculate the number of digits in our program and then compute the sum of individual digits raise to the power number of digits. If this sum equals the input number, then the number is an Armstrong number otherwise not. C program to print Armstrong numbers
Examples:
7 = 7^1
371 = 3^3 + 7^3 + 1^3 (27 + 343 +1)
8208 = 8^4 + 2^4 +0^4 + 8^4 (4096 + 16 + 0 + 4096).
1741725 = 1^7 + 7^7 + 4^7 + 1^7 + 7^7 + 2^7 +5^7 (1 + 823543 + 16384 + 1 + 823543 +128 + 78125)
Armstrong number program in C
int power(int, int);
int main()
{
int n, sum = 0, t, remainder, digits = 0;
printf("Input an integer\n");
scanf("%d", &n);
t = n;
// Count number of digits
while (t != 0) {
digits++;
t = t/10;
}
t = n;
while (t != 0) {
remainder = t%10;
sum = sum + power(remainder, digits);
t = t/10;
}
if (n == sum)
printf("%d is an Armstrong number.\n", n);
else
printf("%d isn't an Armstrong number.\n", n);
return 0;
}
int power(int n, int r) {
int c, p = 1;
for (c = 1; c <= r; c++)
p = p*n;
return p;
}
Output of program: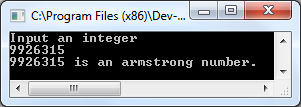
Download Check Armstrong number program.
C program to check Armstrong number using function
We will use long long data type in our program so that we can check numbers up to 2^64-1.
#define L long long
int check_armstrong(L);
L power(int, int);
int main () {
L n;
printf("Input a number\n");
scanf("%lld", &n);
if (check_armstrong(n) == 1)
printf("%lld is an armstrong number.\n", n);
else
printf("%lld isn't an armstrong number.\n", n);
return 0;
}
int check_armstrong(L n) {
L sum = 0, t;
int remainder, digits = 0;
t = n;
while (t != 0) {
digits++;
t = t/10;
}
t = n;
while (t != 0) {
remainder = t%10;
sum = sum + power(remainder, digits);
t = t/10;
}
if (n == sum)
return 1;
else
return 0;
}
L power(int n, int r) {
int c;
L p = 1;
for (c = 1; c <= r; c++)
p = p*n;
return p;
}
An output of the program:
35641594208964132
35641594208964132 is an Armstrong number.
Output




0 Comments